Enterprise Exclusive

Reseller

New
img $0

EN

img Language
Language
Home img Blog img ClonBrowser and dynamic residential proxy configuration tutorial

ClonBrowser and dynamic residential proxy configuration tutorial

by Jony
Post Time: 2024-07-24

Step1: Preparation

Before integration, you need to complete the following preparations


1. Download and install ClonBrowser


2. Get the proxy IP, please refer to the tutorial: Dynamic Residential Proxy (link)


Step2: Proxy Configuration


API Configuration


API configuration is authenticated through the IP whitelist. Please make sure that you have added the local IP to the whitelist before configuration


Please refer to the tutorial for adding a whitelist: (link)


1. Click New Browser

image.png


2. In the proxy position, click New to enter the proxy configuration interface

image.png


3. Select the protocol according to the needs. Here, take http as an example. Fill in the IP and port in the corresponding position, click Detect, and click Save after the detection is successful

image.png


4. Click New Browser again to enter the configuration interface, and click Select in the proxy position

image.png


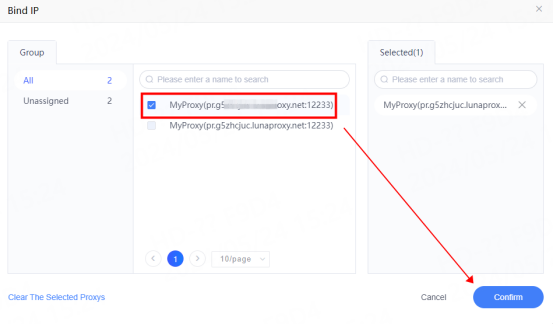
5. Select the proxy you just configured and click Confirm

image.png


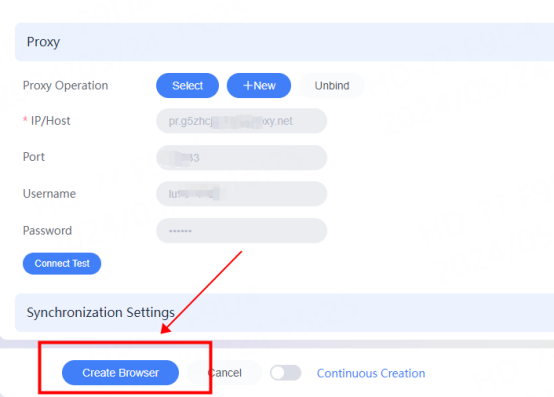
6. As shown in the figure, the proxy selection is successful, click Create Browser

image.png


7. You can see it in the browser interface The browser that has been successfully configured, click Open to use

image.png


Account and password configuration


1. Click Create a new browser

image.png


2. In the proxy position, click Create to enter the proxy configuration interface

image.png


3. Select the protocol according to the needs. Here, take socks5 as an example, and fill in the IP, port, account, and password in the corresponding position

image.png


4. Click Connection Detection. After the detection is successful, click Save

image.png


5. Click Create a new browser again to enter the configuration interface. Click Select in the proxy position

image.png


6. Select the proxy that has just been configured and click Confirm

image.png


7. As shown in the figure, the proxy is successfully selected. Click Create Browser

image.png


8. You can see the successfully configured browser in the browser interface. Click Open to use

image.png


You have successfully integrated LunaProxy with ClonBrowser!


Connection failed


If the detection fails, please refer to our test tutorial: Proxy cannot connect (link)


Table of Contents
Notice Board
Get to know luna's latest activities and feature updates in real time through in-site messages.
Contact us with email
Tips:
  • Provide your account number or email.
  • Provide screenshots or videos, and simply describe the problem.
  • We'll reply to your question within 24h.
WhatsApp
Join our channel to find the latest information about LunaProxy products and latest developments.
logo
Customer Service
logo
logo
Hi there!
We're here to answer your questiona about LunaProxy.
1

How to use proxy?

2

Which countries have static proxies?

3

How to use proxies in third-party tools?

4

How long does it take to receive the proxy balance or get my new account activated after the payment?

5

Do you offer payment refunds?

Help Center
icon

Please Contact Customer Service by Email

[email protected]

We will reply you via email within 24h

Clicky